Troubleshooting#
If you encournter an issue that is not listed here, you can obtain free support for Anaconda through the Anaconda community. For Anaconda installation or technical support options, visit our support offerings page.
Note
The Navigator and Anaconda.org troubleshooting pages have been consolidated into this page. Click to view their sections:
Tip
You can search this page for information using your browser’s search function (Ctrl/Cmd + F).
Anaconda Distribution issues#
403 error#
Cause
A 403 errors is a generic Forbidden error issued by a web server in the event the client is forbidden from accessing a resource.
The 403 error you are receiving may look like the following:
Collecting package metadata (current_repodata.json): failed

UnavailableInvalidChannel: The channel is not accessible or is invalid.
  channel name: pkgs/main
  channel url: https://repo.anaconda.com/pkgs/main
  error code: 403

You will need to adjust your conda configuration to proceed.
Use `conda config --show channels` to view your configuration's current state,
and use `conda config --show-sources` to view config file locations.
There are several reasons a 403 error could be received:
There are a few possible reasons for receiving this error:
The user has misconfigured their channels in their configuration (for example, the secure location where the token is stored was accidentally deleted (most common)
A firewall or other security device or system is preventing user access (second most common)
We are blocking their access because of a potential terms of service violation (third most common)
Solution
First, run the following to undo your configuration:
conda config --remove-key default_channels
When conda is first installed, the default channels it uses to install packages are
https://repo.anaconda.com/mainandhttps://repo.anaconda.com/r(as well ashttps://repo.anaconda.com/msys2for Windows operating systems).If your other channels require a token, install or upgrade the
conda-tokentool by running the following command:conda install --freeze-installed conda-token
Lastly, re-apply the token and configuration settings:
# Replace <TOKEN> with your token
conda token set <TOKEN>
If this doesn’t resolve the issue, Anaconda recommends consulting our Terms of Service error page.
HTTP 000 CONNECTION FAILED#
Cause
This is generally caused by a proxy misconfiguration, which can be corrected by setting your proxy servers correctly. However, because some businesses do not have an easy method of providing their SSL cert, Anaconda recommends bypassing the SSL verification step if you encounter this error.
Solution
If you receive this error message, first run the following command:
conda config --set ssl_verify false
(Package Security Manager users) If necessary, install conda-token by running the following command:
conda install conda-token -n base
(Package Security Manager users) Ensure the token verification step ignores SSL errors by running the following command:
# Replace <TOKEN> with your token
conda token set --no-ssl-verify <TOKEN>
You may see the following warning, though you can safely ignore it:
/Users/<USER_NAME>/Applications/miniconda3/lib/python3.7/site-packages/urllib3/connectionpool.py:1020: InsecureRequestWarning: Unverified HTTPS request is being made to host 'repo.anaconda.cloud'. Adding certificate verification is strongly advised. See: https://urllib3.readthedocs.io/en/latest/advanced-usage.html#ssl-warnings
InsecureRequestWarning,
Using Anaconda behind a firewall or proxy#
Corporate security policies may prevent a new Anaconda installation from downloading packages and other functionality that requires connecting to an external server. To make external connections, you may need to connect to a firewall/proxy. Additionally, your IT team may need to allow connections to https://anaconda.org and https://repo.anaconda.com, as these are the main package repositories.
Solution
To add the proxy information, you will need to add two entries to your .condarc file, located in the user’s home directory. This information should be made available by your IT team and may contain a username and password that is included in the URL. For more information, see configure conda for use behind a proxy server.
Example .condarc file configuration:
channels:
  - defaults

proxy_servers:
  http: http://username:[email protected]:8080
  https: https://username:[email protected]:8443
In some situations, it may be necessary to export the HTTP_PROXY and HTTPS_PROXY environment variables.
set HTTP_PROXY=http://username:[email protected]:8080
set HTTPS_PROXY=https://username:[email protected]:8443
export HTTP_PROXY=http://username:[email protected]:8080
export HTTPS_PROXY=https://username:[email protected]:8443
If these steps have not allowed connections, you should speak to your IT team to verify that security policies are not blocking connections to https://anaconda.com or https://repo.continuum.io.
InsecurePlatformWarning error#
Cause
InsecurePlatformWarning appears only when the installed version of Python is older than version 2.7.9. This message warns only that the validity of the SSL connection is not being verified. It should not affect your package downloads.
Solution
To resolve this, install the updated package ndg-httpsclient:
conda install ndg-httpsclient
Note
When initially installing this package, you receive the SSL warning again. Once it is installed, the package will prevent the warnings.
Anaconda search error: not recognized as an internal or external command/unrecognized arguments#
Cause
If anaconda-client is not installed and you search for a package on anaconda.org using the Anaconda search command:
# Replace <PACKAGE_NAME> with the name of a package you want to search for
anaconda search -t conda <PACKAGE_NAME>
You will receive the following error message:
'anaconda' is not recognized as an internal or external command,
operable program or batch file.
usage: conda [-h] [-V] command ...
conda: error: unrecognized arguments: -t <PACKAGE_NAME>
Solution
To resolve the error, install anaconda-client:
conda install anaconda-client
Then search for a package:
# Replace <PACKAGE_NAME> with the name of the package you are looking for
anaconda search -t conda <PACKAGE_NAME>
Conda: command not found on macOS/Linux#
Cause
The conda shell function is not available or is not working properly. Some causes:
You haven’t started a new shell after installing Anaconda/Miniconda (assuming you allow it to modify your startup script).
You didn’t allow the installer to modify your startup script.
You have set
auto_activate_basetofalse. You need to runconda activate <ENV>, replacing<ENV>with the environment you want active. If you do not specify an environment the default isbase.Conda has been corrupted, usually by a change in the Python package (e.g. 3.6->3.7).
Solutions
If your install is new, close and reopen your terminal application. If you want your terminal to remain open, you can source your ~/.bash_profile or ~/.bashrc file. When you “source” a script, your terminal re-reads it and applies the changes, which usually only happens when the terminal is first opened.:
# Replace bash_profile with bashrc on Linux and Windows Subsystem for Linux
. ~/.bash_profile
—
To initialize conda in your current terminal, run the following command:
<PATH-TO-CONDA-INSTALL>/bin/conda init
For instance, if you installed Anaconda Distribution to the default location on macOS or Linux, your command would look like the following:
~/anaconda3/bin/conda init
—
To see the value for auto_activate_base, run the following command:
conda config --describe auto_activate_base
If your terminal returns true, this means that conda is not automatically activating your base environment when you start a new shell. This behavior emulates your system Python, and some users prefer to have their conda environment be inactive until they need it. However, this is not conda’s default behavior after installation.
To change the value of auto_activate_base, run the following command:
# Replace <TRUE-OR-FALSE> with true or false
conda config --set auto_activate_base <TRUE-OR-FALSE>
If you have auto_activate_base set as false, the conda command will still be available as a shell function, but your base environment will not be active when a new shell is started. To activate your base environment, run conda activate.
Collecting package metadata (repodata.json): - Killed#
Cause
When installing or searching for a package, you may see the process end abruptly with a “Killed” message:
$ conda install numpy
Collecting package metadata (current_repodata.json): done
Solving environment: failed with initial frozen solve. Retrying with flexible solve.
Collecting package metadata (repodata.json): - Killed
This may be because your system lacks the sufficient disk space or memory to complete the process.
Solution
Verify that you have enough disk space and memory on your system to install and use Anaconda packages. The minimum system requirements for Miniconda and Anaconda installers can be found in the conda user guide.
Linking problems when Python extensions are compiled with gcc#
Cause
When compiling Python extensions with gcc on Windows, linking problems may result.
Solution
To resolve these linking problems, use the conda package libpython, a mingw import library that Anaconda builds and includes with the Anaconda Distribution.
Error message: Unable to remove files#
When trying to update or install packages with conda, you may see an error message such as:
Error: Unable to remove files for package: <package-name>
Please close all processes running code from conda and try again.
Cause
This may be caused by a file lock issue.
Solution
Before updating or installing any packages with conda, be sure to terminate any running Anaconda processes, such as Navigator, Spyder, or IPython.
You can also force the installation of the package:
# Replace <PACKAGE_NAME> with the name of the package
# you want to install
conda install -f <PACKAGE_NAME>
Using 32- and 64-bit libraries and CONDA_FORCE_32BIT#
To work with both 32- and 64-bit libraries, Anaconda recommends that you have two separate installs: Anaconda32 and Anaconda64 or Miniconda32 and Miniconda64.
Solution
When working with both versions, add the path to your installer files to the PATH.
To get the information about conda, including your PATH, run the following command:
conda info -a
Caution
Always specify which version you want to work with because mixing 32- and 64-bit packages can cause problems in your environment.
Using
force_32bitis not recommended because it forces 32-bit packages to be installed in the environment, but does not force 32-bit libraries to load at runtime.force_32bitshould be used only when runningconda-buildto build 32-bit packages on a 64-bit system.
Anaconda Distribution installation issues#
Cannot get conda to run after installing#
In macOS or Linux, you may get “conda not found” or “conda is not recognized as an internal or external command” or a similar message, and you cannot execute conda in a terminal window regardless of what path you are on. This will not happen in Windows if you use the Anaconda Prompt terminal dialog.
Cause
When you were installing Anaconda or Miniconda, you most likely answered “No” to the question about prepending the conda prompt to your PATH.
Solution one
Uninstall and then reinstall Anaconda or Miniconda, answering “Yes” to the question about prepending the conda prompt.
Solution two
Manually edit your .bash_profile file to prepend the Anaconda or Miniconda install location.
Open your
.bash_profilefile in a text editor with the following command:open ~/.bash_profile
Add this line to the
.bash_profilefile and save:# Replace <USERNAME> with your username export PATH=/Users/<USERNAME>/anaconda3/bin:$PATH
Close and re-open your terminal window before running a conda command again.
Manually edit your .bashrc file to prepend the Anaconda or Miniconda install location.
Open your
.bashrcfile in a text editor with the following command:open ~/.bashrc
Add this line to the
.bashrcfile and save:# Replace <USERNAME> with your username export PATH=/Users/<USERNAME>/anaconda3/bin:$PATH
Close and re-open your terminal window before running a conda command again.
Recovering your Anaconda installation#
If your Anaconda installation has become corrupted and is in a state where normal conda commands are not functioning, use the following steps to repair Anaconda and preserve your installed packages and environments.
Solution
Download a new installer, then follow the instructions for your operating system.
Note
Use the actual path, filename, and directory name for your installation.
Open a terminal application, such as Command Prompt.
Change your original installer’s name so you do not overwrite it:
move anaconda3 anaconda_old
Run the Anaconda.exe installer as usual and use robocopy to sync the directories:
robocopy anaconda_old anaconda3 /S
Delete your old Anaconda installation directory:
rd /s anaconda_old
Open a terminal application.
Change your original installer’s name so you do not overwrite it:
mv anaconda3 anaconda_old
Install to same directory as your original installer:
# Change the name of your ``.sh`` file, if necessary
bash ~/Downloads/Anaconda3-2023.07-2-MacOSX-x86_64.sh
rsync -a anaconda_old/ anaconda3/
Delete your old Anaconda installation directory:
rm -rf anaconda_old
Open a terminal application.
Change your original installer’s name so you do not overwrite it:
mv anaconda3 anaconda_old
Install to same directory as your original installer:
# Change the name of your ``.sh`` file, if necessary
bash ~/Downloads/Anaconda3-2023.07-2-Linux-x86_64.sh
rsync -a anaconda_old/ anaconda3/
Delete your old Anaconda installation directory:
rm -rf anaconda_old
Run
conda listto view the packages from the previous installation.Run
conda info -eto list the environments created in the previous installation, which are now available in the new installation.
“This package is incompatible with this version of macOS” error when running a .pkg installer on OSX#
When running the .pkg installer, you may encounter this error during the “Installation” step:
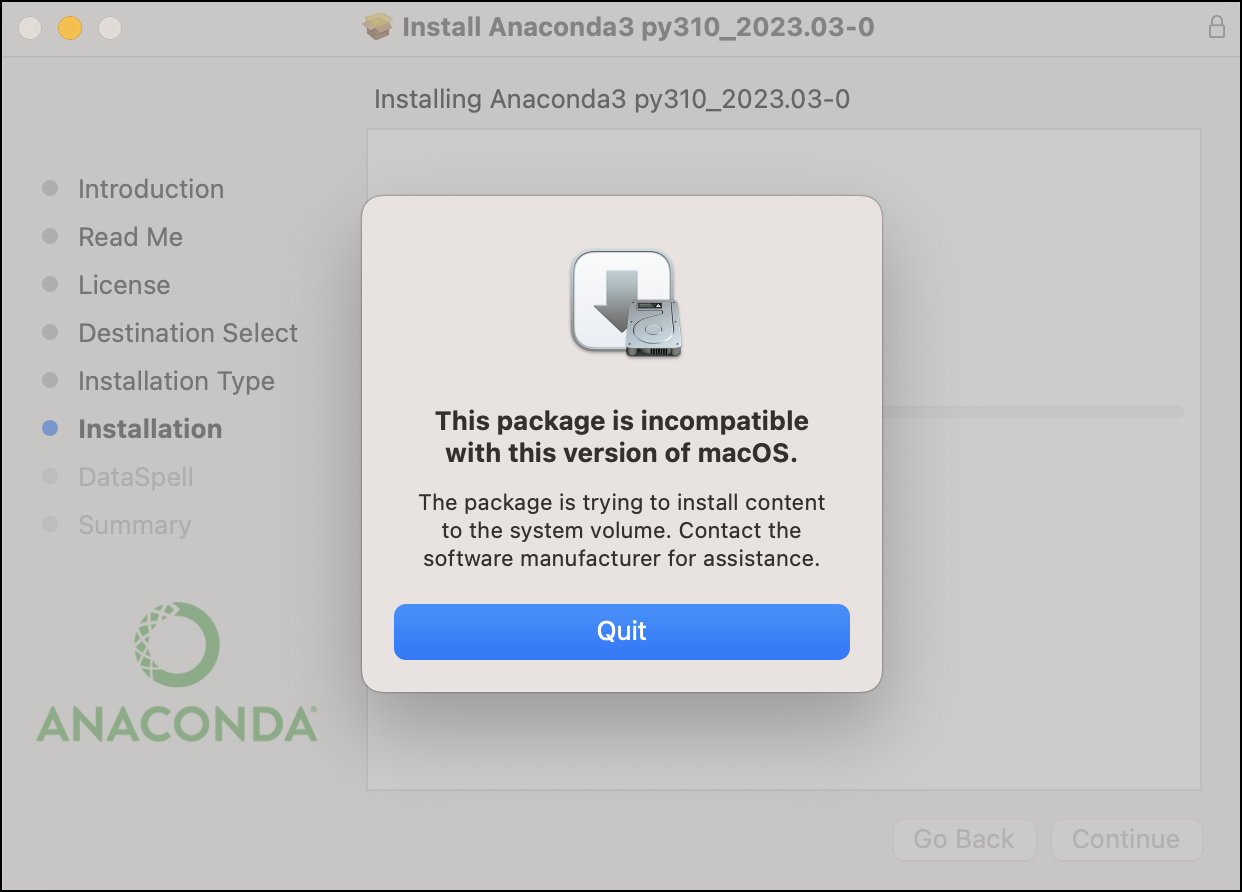
Cause
This error occurs when the installation attempts to write to a directory for which it does not have write permissions.
Solution
Manually select an appropriate install location. The following example shows how to select your user’s home directory.
Re-run the installer and click through until you reach either the Installation Type or Destination Select page.
If you reach the Installation Type page first, click Change Install Location…. This will take you to the Destination Select page.
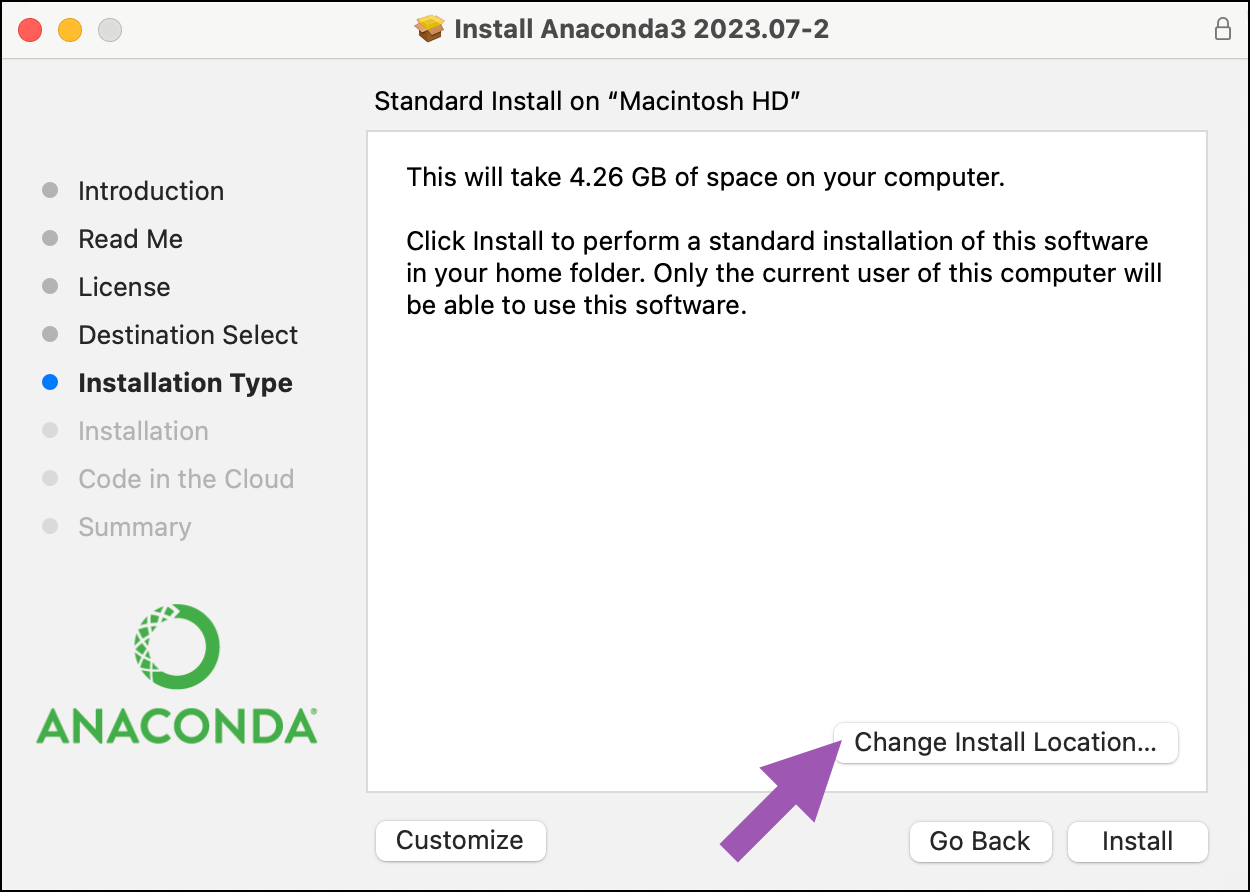
Click Install on a specific disk….
Select the appropriate destination drive. Then click Choose Folder….
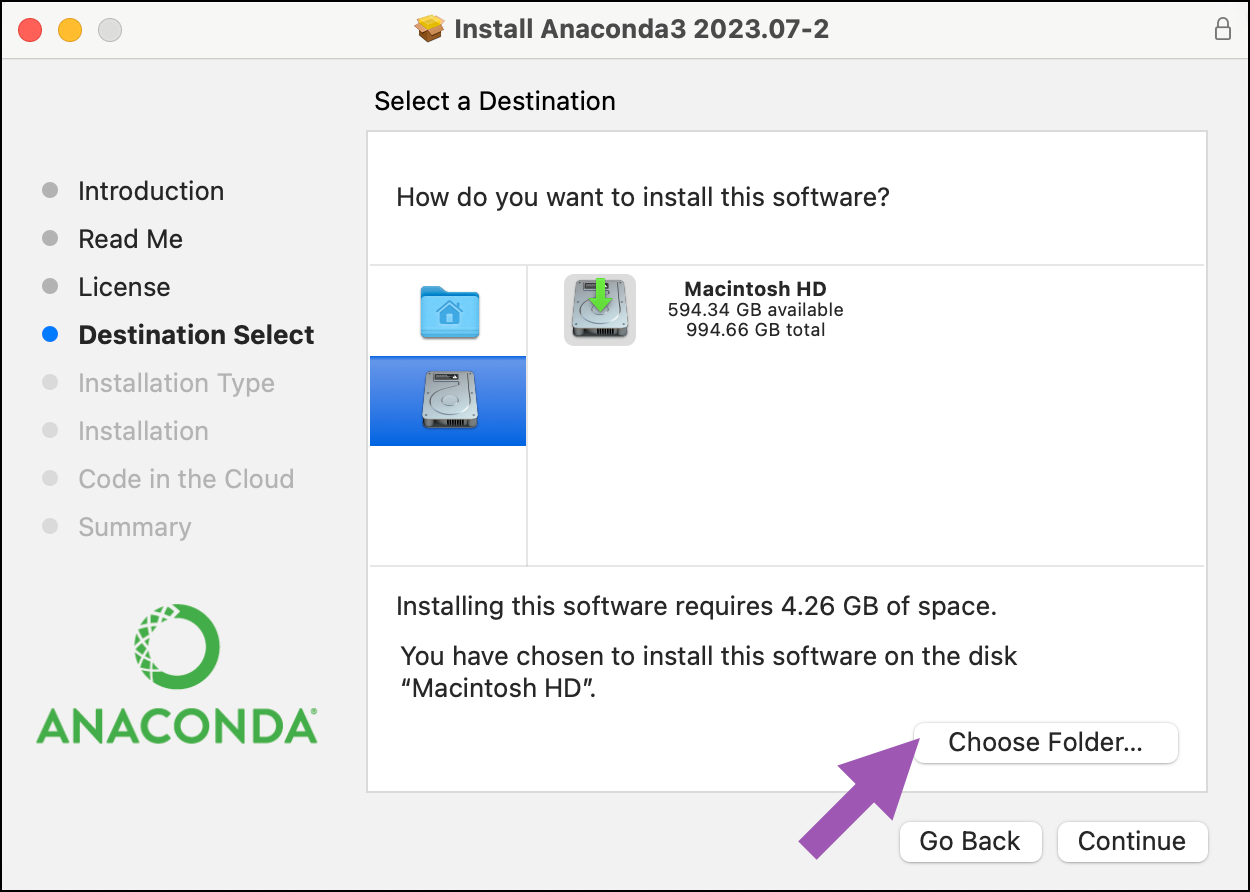
Select your user’s home directory (e.g. /Users/john.doe/). Then click Choose.
In the message box, confirm the name of the install folder you chose in the previous step. Then click Continue.
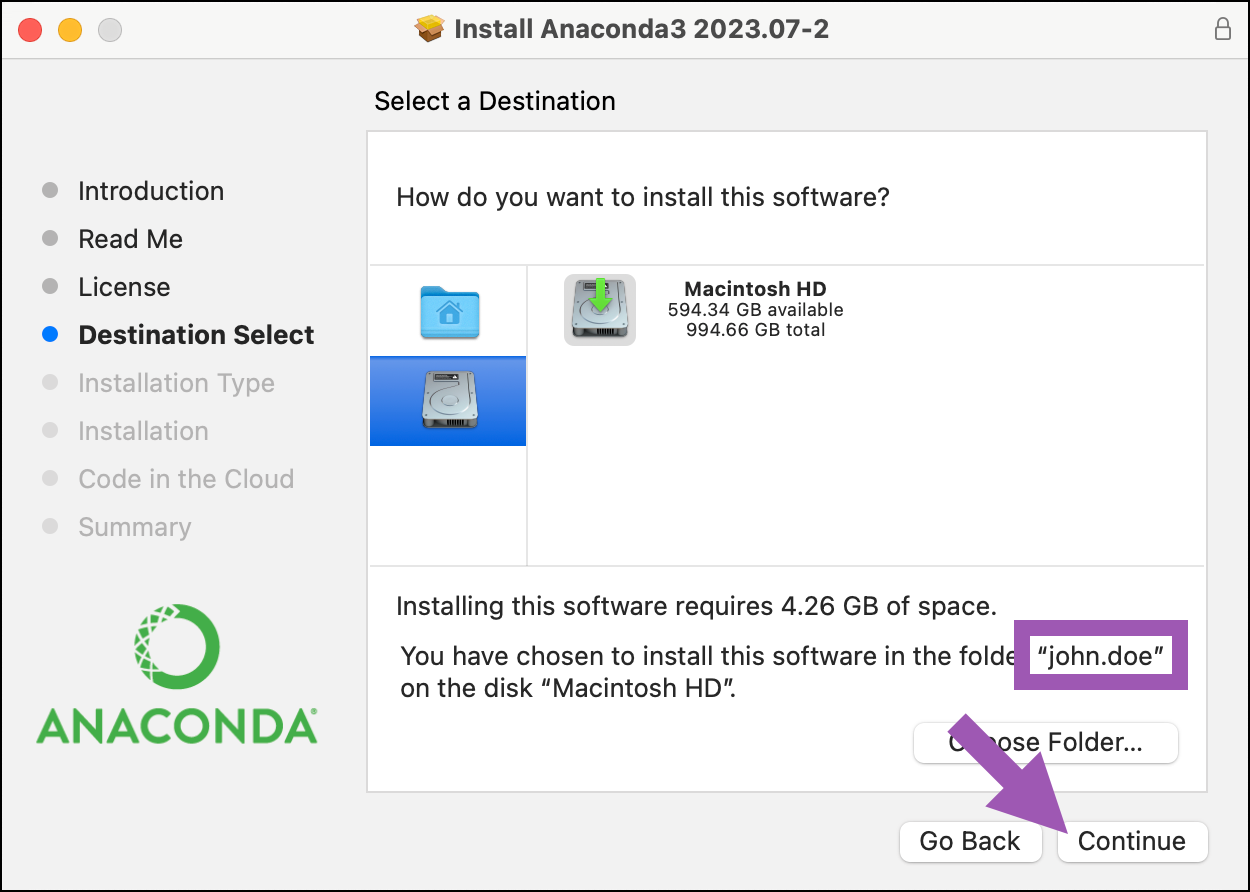
Click Install, and then proceed with the rest of the installation.
If you continue to receive the same error message, please open an issue here, and be sure to include the installation log output from your install.log file, which can be found at /var/log/install.log.
Anaconda installer download problems#
Cause
The Anaconda installer files are large (over 600 MB), and some users have problems with errors and interrupted downloads when downloading large files.
Solution one
Download and install the smaller Miniconda (between 70 and 100 MB).
Download and install the remaining packages in Anaconda by using the following command:
conda install anaconda
Note
If the package downloads are interrupted, just run conda install anaconda again. Conda only downloads the packages that were not finished in any previous attempts.
Solution two
Download the large Anaconda installer file, and restart it if the download is interrupted or you need to pause it.
Find the latest installer at anaconda.com, or an older installer at repo.anaconda.com/archive.
In Chrome, use CTRL + J to open the Chrome download manager.
Click Resume to continue the interrupted download.
The Chrome download manager also enables you to pause and resume or cancel and retry downloads in progress.
Find the latest installer at anaconda.com, or an older installer at repo.anaconda.com/archive.
In Edge, click Settings and more .
Click Downloads to open the Downloads dialog.
From here, you can use the play, pause, and cancel buttons to control downloads in progress.
Tip
Go to edge://downloads/all to open the full page of recent downloads. From here, you can retry cancelled downloads.
Find the latest installer at anaconda.com, or an older installer at repo.anaconda.com/archive.
Click the Settings icon.
Click View Downloads to open the Download Manager.
Click Resume next to the stopped download to restart downloading. The download resumes at the point where it stopped.
Open a terminal window.
To download the file, use the following command:
# Replace <SH-FILE> with the the `.sh` installer file you want to install.
# See all available installers on https:://repo.anaconda.com/archive/.
curl -O https://repo.anaconda.com/archive/<SH-FILE>
To pause the download, use CTRL + C.
Note
While a download is paused, you can shut down or restart your computer.
When you are ready to resume your download, use the following command:
#Replace <SH-FILE> with the same file you used above
curl -O -C https://repo.anaconda.com/archive/<SH-FILE>
Note
The
-Cflag is the option for “continue”. You can pause and restart a download as many times as you wish.
Error message on Miniconda install: Already installed#
Cause
This situation can occur if you are getting a conda error and you want to reinstall Miniconda to fix it.
Solution
For macOS and Linux, download and install the appropriate Miniconda for your operating system from the Miniconda download page using the force or -f option:
# Replace the name of the installer if you need
# a different version or operating system
bash ~/Downloads/Miniconda3-latest-MacOSX-x86_64.sh -f
Caution
Make sure to install to the same location as your existing install so it overwrites the core conda files and does not install a duplicate in a new folder.
Conda update anaconda command does not install the latest version of Anaconda#
Cause
For users who have installed packages that are not compatible with the latest version of the Anaconda metapackage, running conda update anaconda updates the Anaconda metapackage to the latest compatible version, but this may not be the latest version.
Solution
Obtain a list of the conflicting packages by running
conda update anacondaorconda install anaconda=2023.07.Note
Replace
2023.07with the latest version number.Enter
nto cancel the installation or update.Once you know which packages are conflicting, you can:
update all current packages without upgrading to the latest version of Anaconda, or
remove the conflicting packages and then upgrade to the latest version of Anaconda.
—
To update all current packages without upgrading to the latest version of Anaconda:
Remove the Anaconda metapackage itself by running the following command:
conda remove anaconda
Note
This will not remove any of the packages included with Anaconda.
Update all currently installed packages by running the following command:
conda update --all
—
To remove the conflicting packages and upgrade to the latest version of Anaconda:
Remove the conflicting packages by running the following command for each one:
conda remove <PACKAGE_NAME>
Update to the latest version of Anaconda:
conda update anaconda
“The installation failed” message when running a .pkg installer on OSX#
Cause
When running the .pkg installer, you may see this message at the end of the installation:
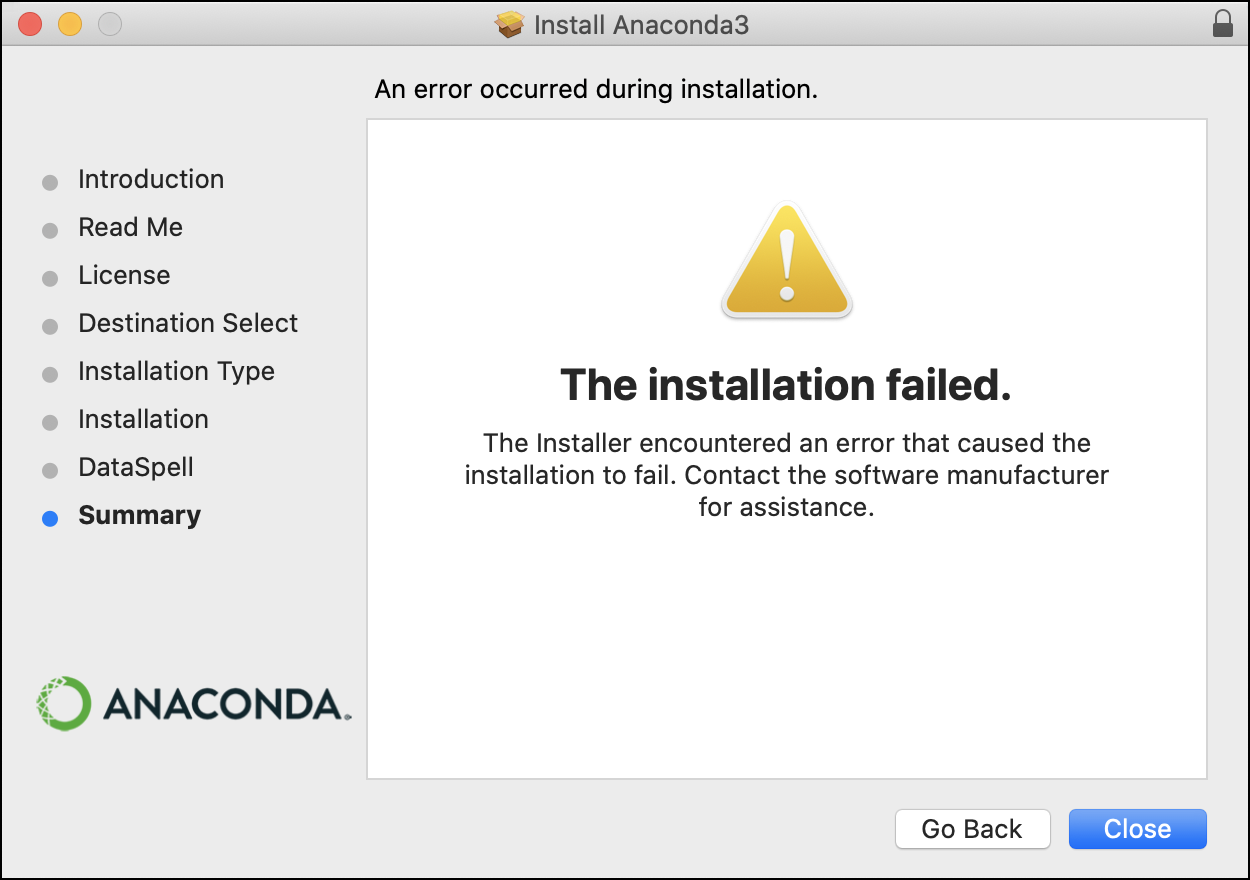
If so, check for the following:
Open your
/var/log/install.logfile and check whether the most recent lines show errors following a call toconda init --all.open /var/log/install.logIn your
$HOMEdirectory, check whether the owner of your shell config files isroot:ls -la ~/.bash_profile ~/.config/fish/config.fish ~/.tcshrc ~/.xonshrc ~/.zshrc

Solution
If both of the above are true, do the following:
Change the owner of your shell config files to your current user:
sudo chown -R $USER ~/.bash_profile ~/.config/fish/config.fish ~/.tcshrc ~/.xonshrc ~/.zshrc

Uninstall the previous installation. Then re-run the installer, making sure to select the Install for me only option.
Windows-specific Anaconda Distribution issues#
Anaconda interfering with other software on Windows#
Cause
If a user chooses to add Anaconda to the Windows PATH, this can cause programs to use the new Anaconda versions of software (like Python) and not the versions that were already in place. In some cases, this can cause incompatibility and errors.
Solution
Anaconda recommends against adding Anaconda to the Windows PATH manually. Instead, use Anaconda software by opening Anaconda Navigator or Anaconda Prompt from the Start Menu.
Files left behind after uninstalling Anaconda on Windows#
Cause
Some users may need to keep settings files and other users may need to delete them, so Anaconda leaves some settings files in place when it is uninstalled. Specifically, the directories .spyder2, .ipython, .matplotlib, and .astropy remain. Depending on your version of Windows, these may be in C:\Documents and Settings\<USERNAME> or in C:\Users\<USERNAME>.
Note
Replace <USERNAME> with your Windows username as it appears in the Documents and Settings or Users folder.
Solution
Manually delete any unneeded settings files.
Spyder errors or failure to launch on Windows#
Cause
This may be caused by errors in the Spyder setting and configuration files.
Solution
Close and relaunch Spyder and see if the problem remains.
Open the Start Menu and then click Reset Spyder Settings and see if the problem remains.
Close Spyder and relaunch it from Anaconda Prompt with the following command:
spyderDelete the directory
.spyder2and then repeat the first item in this list. Depending on your version of Windows,.spyder2may be inC:\Documents and Settings\<USERNAME>or inC:\Users\<USERNAME>.
Note
Replace <USERNAME> with your Windows username as it appears in the Documents and Settings or Users folder.
Uninstaller requests admin privileges on Windows#
After installing Anaconda or Miniconda as a non-administrative user on Windows, uninstalling may prompt for administrative privileges.
Cause
This occurs when running the uninstaller by choosing Control Panel > Uninstall a program, selecting Anaconda or Miniconda from the list of programs, and clicking Uninstall.
Solution
Open the anaconda3 or miniconda3 installation folders and run the .exe file uninstaller from that location. Uninstallation will complete without prompting for administrative privileges.
EXAMPLE: If you installed Miniconda3, the uninstall file will be Uninstall-Miniconda3.exe. Users who installed Miniconda2 or Anaconda will find a similar file with the appropriate name.
Windows permission errors when installing from Favorites folder#
Cause
The Windows Favorites folder has unusual permissions and may cause permission errors with installers of any software. If you try launching the installer from the Favorites folder, you may see errors such as “Setup was unable to create the directory”, “Access is denied”, or “Error opening file for writing”.
Solution
Move the installer to a different folder and run the installer from the new folder.
Trouble with activation on PowerShell on Windows#
Some users might run into the following backtrace on Windows:
File "C:\Users\damia\Miniconda3\lib\site-packages\conda\activate.py", line 550, in _replace_prefix_in_path
assert last_idx is not None
AssertionError
Solution
Open a Command Prompt window.
Navigate to where you installed conda. The following command shows the default:
cd C:\Users\<USERNAME>
Run the following command:
python -m conda init
Close the Command Prompt window.
Note
If this doesn’t work, try running:
conda update conda
MacOS-specific Anaconda Distribution issues#
.zshrc not updated under macOS Catalina#
Cause
MacOS Catalina changed the default shell from Bash to zsh.
Solution
To initialize conda for zsh:
Open a terminal application and run the following command:
bash -c "conda init zsh"
Close and reopen your terminal application.
Segmentation fault on package import with macOS Python 3.7 interpreter#
In CPython < 3.8, using python3-config to determine a linking command line to compile an extension module will cause that extension module to segfault upon import. python3-config does provide command-line flags, but for the different purpose of embedding a Python interpreter.
Cause
This is because of the command-line flags returned by python3-config. Before Python 3.8, those are needed to embed the core Python interpreter into a different project altogether and not those that should be used when linking a Python extension module.
Python modules should never link to the core Python interpreter library directly, either statically at build time or dynamically at runtime. This is because the Python executable itself provides all the necessary functions and symbols.
Solution
You should only use python*-config —ldflags when linking to an interpreter library (either static or shared).
Action |
Python < 3.8 |
Python >= 3.8 |
|---|---|---|
Get command line to link to extension module |
|
|
Get command line to embed Python interpreter |
|
|
python3-config doesn’t include the command/compiler name, whereas the sysconfig way does. This works provided none of your arguments have spaces:
python -c "import sysconfig; print(' '.join(sysconfig.get_config_var('LDSHARED').split(' ')[1:]))"
Linux-specific Anaconda Distribution issues#
Missing libgomp on Power8#
If the Python command import numpy fails, the system is likely missing the libgomp system library.
Cause
Most Power8 Linux distributions include libgomp, but some may not.
Solution
Check whether the system is missing libgomp by running the following command:
conda inspect linkages -n root numpy
If libgomp.so.1 is listed in the not found: section, it must be installed.
Install libgomp on Ubuntu by running the following command:
apt install libgomp1
Install libgomp on Red Hat Enterprise Linux (RHEL) or CentOS by running the following command:
yum install libgomp
Anaconda on Power8 reports “can not execute binary file”#
Cause
Anaconda on Power8 only supports little endian mode. The little endian Python binary will not execute on a big endian operating system.
Solution
Install Anaconda on Power8 on a little endian Linux installation or VM.
Anaconda.org issues#
Captcha not appearing when trying to create an Anaconda.org account on Firefox#
The captcha at the bottom of the Sign In panel on Anaconda.org sometimes fails to appear on Firefox browsers.
Cause
The captcha may be blocked by an ad blocker extension, tracking blocker extension, or Firefox’s privacy settings.
Solution
Refresh your browser and try again. If refreshing multiple times, wait a few seconds between each refresh.
Check your extensions. Extensions that block tracking or ads may also block the captcha.
Check your browser settings. Privacy settings may block the captcha.
Open the sign in page in a private browsing window.